Showing posts with label quilt. Show all posts

Saturday, December 11, 2010

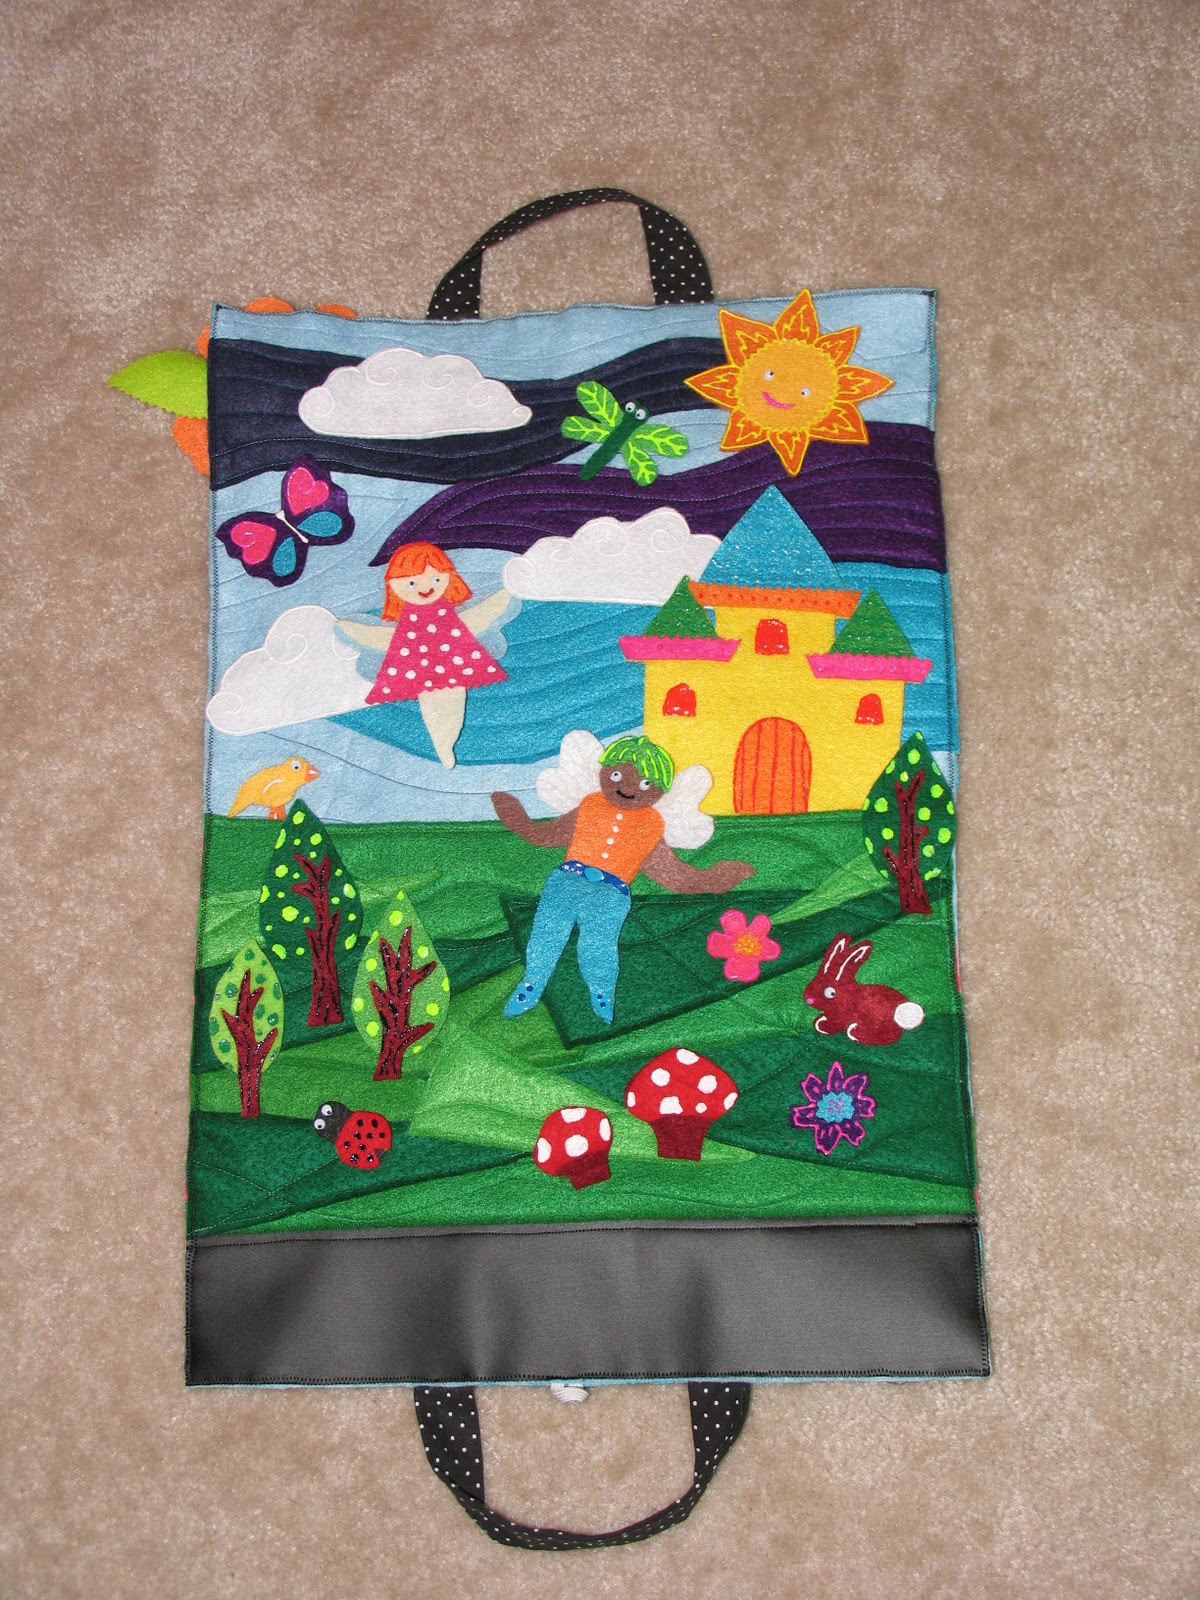
Traveling Felt Fairy Scene

It's been a while since I have posted here but I have moved and now have an 8 month old little girl, so needless to say I have been a bit busy, but I have been meaning to make a bunch of posts (just because I stopped blogging didn't mean I stopped creating). So I will be trying to post a few new projects this week!!

The latest project I have been working on was from a blog that I read. (It's a great blog! You should check it out!) Anyway, I decided I would make this for my niece for Christmas since it was just so cute and so easy!! I made a few changes to mine (as you can tell) but her way would have been way easier and is super cute! But I just had too much fun and found myself unable to stop (and still think I could add more scenes each birthday or Christmas or she could add her own!)

Materials needed:
• lots of felt and in several colors!!!
• 2 larger rectangles of felt for the outside and inside panels (I didn't measure mine I just cut it out)
• scrap of chalkboard fabric (optional- but totally awesome!!!!)
• puffy paint
• button
• scrap of elastic
• glue (white glue that dries clear works well here)
• sewing supplies
• small googly eyes (optional)
• hot glue gun (optional- I used it to glue the flower together on the front)
• scraps of cotton fabric (I made the handles and the a's on the front out of this material)
• double sided fusing (optional -used for applying cotton fabric letters to felt)


Everything closed up and ready to travel

Finished board

Pocket on finished board 
Empty board with play pieces

Play pieces

Sample of finished scene

Finished scene with title on chalkboard fabric

Close up detail of chalkboard fabric

To start this project I cut out a large rectangle out of 2 big pieces of felt. I didn't measure- not my style :) One of the rectangles is for the outside and will be the front and back when closed. One rectangle is for the main inside panel. 

Next I made a pocket panel. I was going to just have a solid green piece for the grass but low and behold I did not have enough of one green so I had to get a solid piece of felt and placed triangles of "grass" around it and quilted it. I loved how it turned out! I also added a long rectangle of chalkboard fabric (mainly because I had some extra and I am in LOVE with it!!!) so she could write whatever she wanted there.

The next step was to make my sky more funky too. I cut out some "wind" shapes and quilted it as well. 

Next I worked on the detail for the front. Here I just cut out her name (nothing special just free handed it) and then took a piece of cotton fabric and ironed on the double sided fusing to it). I drew an a on a piece of paper cut it out flipped it and traced it on the paper side of the fusing then cut out both a's and ironed them on to the front (after dry fitting it and figuring out how I wanted it to lay it out). Then I took the other felt letters of her name pinned them down and just sewed a line down the middle (also sewing the cotton letters too).

For the handles I used the same cotton fabric and cut out 2 long rectangles the same size and then sewed them right sides together and flipped them, ironed them, and pinned them in between the inside and outside panels. I also took my little bit of elastic and placed it in the center between the inside and outside panels on one side.

Then I pinned it all together. The inside and outside panels as well as the pocket. Then I sewed it up on all 4 sides with a zigzag stitch and then trimmed the edges...you could use a Serger but sadly I don't have one :(

For the flower on the front I cut out petal shapes for the petals one larger size and one smaller sized. I then glued the center bottom part and pinched it together (being careful of hot glue!!!) and glued them all together large ones first and then smaller ones on top. For the leaves I cut out 2 leaf shapes and added a dot of hot glue to the center bottom and pinched. For the center part of the flower I cut out a circle using my pinking shears and then sliced little lines toward the center (but keeping the center solid). Then I folded it onto itself added dabs of hot glue and attached it to the center of the flower. Then I hot glued it on. 

To finish off the carrier/background I added the button to the front panel where her name was (opposite the side with the elastic) using the elastic as my guide for placement. 

To do the play pieces I just came up with things I wanted to do, such as fairies, castle, rainbow, bugs, animals, nature things...then I cut out basic shapes to create them (all of it was free hand but I am sure you could look up silhouette pictures if you wanted to trace them). I glued the pieces together and let them dry. For detail I added puffy pen lines and dots and such (even used glitter puffy paint for the wings of the fairies). Then for the eyes I used small googly eyes (because I always love a reason to use googly eyes :)

Once all of your pieces are done and dry place them in the pocket, add a pack of chalk (maybe a chalk eraser) and it is the perfect present for a little girl.

When my little lady gets older I think I want to make her a monstar making one...complete with eyes, mouths, warts, whatever :)

Wednesday, June 3, 2009

Recycled T-Shirt Baby Quilt

Materials needed:
• 6-12 old t-shirts (or scrap material)
• sewing machine & thread
• embroidery thread
• batting (or old sheet or fabric)
• scrap fabric for borders
• yard or so of fabric for back
• patches (optional)
• felt (optional)
• yarn (optional)


close up view

I am one of those people who feels emotionally attached to my clothing, so I always had a hard time cleaning out my closet when the time came. Even though things wouldn't fit I just couldn't help but wanting to keep them because inevitably they reminded me of some time in my life. So instead of letting them just sit in my closet and never see the light of day I decided to make my husband and I a quilt out of them. The original one is a huge and it took me 2 years to finish (note: I worked on it on and off for the 2 years mainly waiting to collect enough old clothes in the process but I think if I was diligent on it and had all the scraps I needed it would have taken me about 4 months).

This one above took me about 3 days. It is a small version that I made for my little Zoe, while I was pregnant. I really loved the idea that she would sleep with our shirts and smell and be "protected" by us. I have made this baby blanket sized quilt a few other times and don't find it to be too hard to do with a little time and patience.

To start I gathered scraps of t-shirts from our other quilt but chances are you don't have that so you can either use scrap material you have or just gather 6-12 t-shirts that you no longer wear any more but have some attachment to. Then I got a piece of scrap foam board (anything thing and sturdy will do I used it as my template) I measured out how big I wanted the squares. In this one above there are 2 different sizes a smaller square and a larger one. I made the smaller ones 1/2 the size of the larger one and added a 1/4 in seam allowance (meaning the bigger one was 8.5 in sq and the smaller one then would be 4.25 in sq plus the 1/4 in for the seam allowance giving me 4.5 in sq). . Another great idea I have seen is that you just cut long strips and sew them together which gives it a fun stripy look. You of course can do just about anything you want- shapes, colors, whatever you can think of.

So after making my templates I grabbed my shirts and placed the template right on top and then used my rotary cutter and cut around the template (you can also mark it with sewing pencils or chalk and then cut on your line). Once I had enough to lay it down (the total size of my quilt with out the border was 27.5 in x 36.5) I laid out the pieces the way they looked best to me. I just did a simple pattern here of a big square, 4 small squares, big square, 4 sm. sq. across and then switched it for the next row and made it 4 sm sq, big sq, 4 sm sq, big square and again for the next row I switched it back. Ending with 4 rows across and 4 rows down (and a row I count as the size of my big square).

Once they are in position the way I like them I take one section of the 4 sm sq and sew those together to make a piece that is as big as my bg sq. I do this for all my sm sq until they are all in big pieces. Then I pin my first row together and sew it. Then I take my second row and sew it and then the third row and sew it. Then I pin the first row to the second row and sew and then that piece gets pinned to the 3rd row and I sew it.

Once that whole center piece is done I then find a scrap fabric to make a border on my edges (normally this means it will be a mix of colors but you can of course finish it off with the same color and fabric or whatever is easiest for you). For the border on this one I used 2 inches thick of material and sewed it to my shorter sides all the way up. Then I trimmed off the excess material (I didn't do any measuring lengthwise because when I do I inevitably end up with miss matched pieces in the bad way- this is how I avoid any problems). I did the same to the other short side (I did this so my sides would look the same but you can just work your way around if you want- going from short side to long side to short side to long side or if you know how you can even make diagonal cornors). Once the 2 short sides were done I did the long sides.

When your border is finished I then added a little batting. I used the batting (from the fabric store) I had left over from my other quilt but if you want you can also use old sheets or old curtians- whatever. Then I laid the quilt onto the batting with the quilt facing up. I smoothed it out and pined it using quilt safety pins. The reason I use those is because they don't rust out in time and this project can take a while (like my 2 year quilt). Then I trimmed it down to about the edge of my borders just to make it easier to work with.

Next I got embroidery thread (leaving it as 6 strands but you can make it as thick as you want) and did a simple stitch around where I sewed my t-shirts together, sewing the t-shirts to the batting. I loved doing this chunky hand stitch because it really looks hand done and has a quirkiness about it.

Once I sewed all of my squares to the backing I then trimmed down the batting about 1/2 in from the edge of the border all the way around (I leave it on at first just in case I pull on the batting and end up too short on one side). Then I added my monstar and dragonfly. To do the monstar I just cut the shapes out of felt and fleece remnants I had and then hand stitched it to my quilt before finishing it off I got a little bit of fiber fill and stuffed it making it 3-D but plush still. Then I got some patches (a dragonfly and flower) and hand sewed them on.

When the decorating is done I got a large section of scrap fabric (it measured over the final size of my quilt) from my other quilt or you can buy about a yard of a soft fabric (measure your final piece and make sure to get enough fabric for your piece) or just sew a couple of larger scraps together. Then I pinned it with right sides together and started sewing starting the edges together leaving an opening for me to flip it inside out.

Once sewed I trimmed the corners so they would lie flat and then flipped it inside out. Then I pinned the border down and sewed (stitch showing) around my border close to the t-shirt part. This helps it attach to the back piece of fabric better. Then I hand stitched my opening closed using a simple slip stitch and it was finished. If you are making a larger quilt I recommend getting some scrap yarn and sewing little knots on the corners of your squares to tie them to the fabric below. On the small quilt this doesn't matter as much but the larger the quilt the more stability you need to keep the 2 pieces from sliding around.