Saturday, December 11, 2010

Monstar Christmas Stockings!!

This came from a great shop on Etsy and of course when I saw it I knew I had to make one for our family (I would have totally bought them but she didn't have enough variety for my family- I think hers are MUCH cuter!!!)!!! I needed to make our newest addition's stocking anyway so why not make a whole new set?!?!

Here is what I did....

Materials needed:
• lots and lots of felt (large pieces for the main stocking part and scraps for details)
• sewing supplies
• glue (for those tiny pieces you just can't sew or for all of the details if you want)

My crew of monstar stockings!

Me as a monstar (all crazy like :)

Pocket for stuffing yummy treats!!

My husband as a monstar (he's a bit of a grinch :)

Pocket detail

AJ (our 8 month old daughter) as a monstar (note the teeth- though now she has 4! :)

Pocket detail

Ethan our first child (he was still born but remains a part of our lives) as a monstar

Pocket detail

To make these I simply cut out 3 large rectangles with rounded corners (again, I am not a measurer so I just said this looks good and cut out my pieces). On one of the rectangles I cut off the top and made it the mouth and pocket for stuffing.

To create the loop to hang it from I cut out 2 small, long rectangles and stitched them together (to make it thick and stronger) and then folded it and touched the 2 raw edges together and pinned it in between the front and back panels at the top

Then the fun part...decorate...create your monster add all the details and when you like your monstar the way you like it figure out what needs to be sewn first and start sewing!!! *note to make it sturdier I cut out 2 of each body part that would hang off the main rectangle base and stitched them together but only glued or stitched details to the front.

For me, I stitched down the details on arms, hair, feet, ect... or glued them down if they were too small (and waited for the glue to dry before stitching anything to them). Then I took the mouth pocket part and I folded over the edge and pinned it and then added my tongue or teeth where I wanted them and pinned them then stitched straight across it (stitching showing). Then I added the tummy detail sewing it to the pocket part only. Then for the wings I stitched a line down the back piece. Next I stitched down the eyes/ and face detail. Then I took any body part that would hang out of the felt (arms, legs, tentacles, horns, hair) and placed them between the front and back panels and then placed the pocket part onto the front and stitched around the perimeter of the main rectangles. I added shoes and stitched around the outside of it.

It took me a while to figure out the best order to sew it all in (esp because I wanted to us matching thread for the body parts so it took A LOT of switching thread and I tried to minimize when possible!) but once I did I was so glad I did it. I would have had to leave out a lot of things had I not planned it a bit.

Now they are hung and stuffed and ready for Christmas morning (which will be tomorrow for us since we are going to be traveling for the holidays but still wanted to have AJs first "Christmas" be in our new house!)

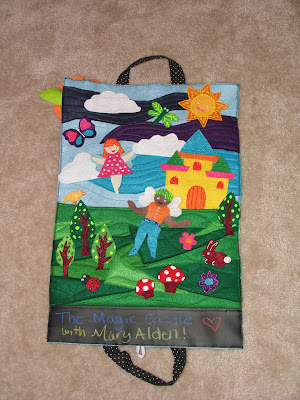
Traveling Felt Fairy Scene

It's been a while since I have posted here but I have moved and now have an 8 month old little girl, so needless to say I have been a bit busy, but I have been meaning to make a bunch of posts (just because I stopped blogging didn't mean I stopped creating). So I will be trying to post a few new projects this week!!

The latest project I have been working on was from a blog that I read. (It's a great blog! You should check it out!) Anyway, I decided I would make this for my niece for Christmas since it was just so cute and so easy!! I made a few changes to mine (as you can tell) but her way would have been way easier and is super cute! But I just had too much fun and found myself unable to stop (and still think I could add more scenes each birthday or Christmas or she could add her own!)

Materials needed:
• lots of felt and in several colors!!!
• 2 larger rectangles of felt for the outside and inside panels (I didn't measure mine I just cut it out)
• scrap of chalkboard fabric (optional- but totally awesome!!!!)
• puffy paint
• button
• scrap of elastic
• glue (white glue that dries clear works well here)
• sewing supplies
• small googly eyes (optional)
• hot glue gun (optional- I used it to glue the flower together on the front)
• scraps of cotton fabric (I made the handles and the a's on the front out of this material)
• double sided fusing (optional -used for applying cotton fabric letters to felt)


Everything closed up and ready to travel

Finished board

Pocket on finished board 
Empty board with play pieces

Play pieces

Sample of finished scene

Finished scene with title on chalkboard fabric

Close up detail of chalkboard fabric

To start this project I cut out a large rectangle out of 2 big pieces of felt. I didn't measure- not my style :) One of the rectangles is for the outside and will be the front and back when closed. One rectangle is for the main inside panel. 

Next I made a pocket panel. I was going to just have a solid green piece for the grass but low and behold I did not have enough of one green so I had to get a solid piece of felt and placed triangles of "grass" around it and quilted it. I loved how it turned out! I also added a long rectangle of chalkboard fabric (mainly because I had some extra and I am in LOVE with it!!!) so she could write whatever she wanted there.

The next step was to make my sky more funky too. I cut out some "wind" shapes and quilted it as well. 

Next I worked on the detail for the front. Here I just cut out her name (nothing special just free handed it) and then took a piece of cotton fabric and ironed on the double sided fusing to it). I drew an a on a piece of paper cut it out flipped it and traced it on the paper side of the fusing then cut out both a's and ironed them on to the front (after dry fitting it and figuring out how I wanted it to lay it out). Then I took the other felt letters of her name pinned them down and just sewed a line down the middle (also sewing the cotton letters too).

For the handles I used the same cotton fabric and cut out 2 long rectangles the same size and then sewed them right sides together and flipped them, ironed them, and pinned them in between the inside and outside panels. I also took my little bit of elastic and placed it in the center between the inside and outside panels on one side.

Then I pinned it all together. The inside and outside panels as well as the pocket. Then I sewed it up on all 4 sides with a zigzag stitch and then trimmed the edges...you could use a Serger but sadly I don't have one :(

For the flower on the front I cut out petal shapes for the petals one larger size and one smaller sized. I then glued the center bottom part and pinched it together (being careful of hot glue!!!) and glued them all together large ones first and then smaller ones on top. For the leaves I cut out 2 leaf shapes and added a dot of hot glue to the center bottom and pinched. For the center part of the flower I cut out a circle using my pinking shears and then sliced little lines toward the center (but keeping the center solid). Then I folded it onto itself added dabs of hot glue and attached it to the center of the flower. Then I hot glued it on. 

To finish off the carrier/background I added the button to the front panel where her name was (opposite the side with the elastic) using the elastic as my guide for placement. 

To do the play pieces I just came up with things I wanted to do, such as fairies, castle, rainbow, bugs, animals, nature things...then I cut out basic shapes to create them (all of it was free hand but I am sure you could look up silhouette pictures if you wanted to trace them). I glued the pieces together and let them dry. For detail I added puffy pen lines and dots and such (even used glitter puffy paint for the wings of the fairies). Then for the eyes I used small googly eyes (because I always love a reason to use googly eyes :)

Once all of your pieces are done and dry place them in the pocket, add a pack of chalk (maybe a chalk eraser) and it is the perfect present for a little girl.

When my little lady gets older I think I want to make her a monstar making one...complete with eyes, mouths, warts, whatever :)

Wednesday, June 24, 2009

Duct Tape Rings

Materials Needed:
• Duct Tape
• scissors
• goo gone & rag (to clean your scissors)


*all three rings


*detail


*detail

This idea came to me last night while I was watching tv. I found a piece of Duct Tape I had placed on the coffee table (that is sometimes where the scrap Duct Tape ends up when I am working on my crafts) and I started folding it and thought it kind of looked like a ring since it was so small so then of course I had to make it into a ring (which ended up being a few rings). I used the same method as my Duct Tape headbands but smaller of course. The bow one is my favorite. It reminds me of that tying a string on your finger so that you don't forget something.

So to do this I grabbed the Duct Tape and measured it around my finger (another percise measurement). Then I cut it half lenthwise and placed one half on my coffee table and the other half I held it lengthwise and folded the bottom part up to the center and then folded the top down covering all the exposed sticky sides then I wrapped it around my finger and cut a tiny piece from my coffee table left overs and wrapped it around the open parts of the bent ring giving me a closed up ring.

Then I added the details. For the stripes I just cut tiny strips and placed them around the ring. When I did the bow I used the same method as making the ring but folded it into a bow and placed yellow tape around the center tightly to secure it to the ring as well as give it the center part of the bow. For the flower started off the same way as making the ring but instead of folding both the upper and lower sides down I just did the upper side and then while crunching it up together and wrapping it around itself (using the exposed sticky part to "glue" it together) I made a rose. Then to attach it I used tiny strips of Duct Tape (from my coffee table again) and wrapped it around in different directions until I felt it was secure.

T-Shirt Monstar Pot Holders

Materials Needed:
• old t-shirts or scrap material
• quilt batting
• sewing machine & thread
• needle & thread
• scissors


*close up


*close up

To make these fun little pot holders I grabbed some of my scrap t-shirt material and picked the one I wanted for the background and cut out a "square" (no exact measurements again). I used that first one I cut out as a template to cut out another of the same fabric and 2 of a different fabric for the back. Next, using my template, I cut out some quilt batting the same size (you will need at least 2, I used 4 because I wanted mine to be well insulated). I machine sewed the bating to the fabric, right side of fabric out. I did this for the other 3 sides as well. Then I took my 2 front pieces and cut out shapes from my other scrap t-shirt material and made my monstar on top. When I got it the way I wanted it I hand stitched the monstar onto the top fabric and top batting. When I was finished I put the monstar facing down on top of the back piece facing up (right sides together) and stitched with my machine all the way around leaving a large gap to flip it inside out. The first time I didn't leave enough space to flip it forgetting how bulky it would be with the 2 layers of batting so I had to seam rip it and re-sew. Then once it was flipped inside out I hand sewed it shut.

Monday, June 22, 2009

Duct Tape Monstar Bookmark

Materials Needed:
• Duct Tape
• craft knife
• self healing cutting board
• paper & pencil


* front & back

This project is similar to the Duct Tape Monstar Coaster project I did earlier, only this time I made a cut out book mark that I so often find myself needing.

Once again I recommend the self healing cutting board this way you can stick the duct tape down and cut the shape you need with your craft knife.

To start I sketched out the design keeping it more vertical than horizontal. Then I used that to make some templates out of paper. Then I grabbed the color of Duct Tape I wanted to be my background and taped down a few strips overlapping about the width and height of how I wanted the book mark to be then I flipped it over and taped the other side so that I was left with the colored Duct Tape showing on both sides. Then I took the colors I wanted the body of my monstar to be and placed it down on the self healing cutting board and placed my template on top and cut out the monstars body. Then I peeled it up and placed it on the background piece. I continued this method until I had the entire front of the monstar done. Then I cut out around the entire monstar.

Once he was cut out I then turned it around and prepared to do the back side of my monstar. I started the same why by putting the Duct Tape down on the self healing cutting board but when I got to the template part I flipped it over to the wrong side facing up. Then I cut out my shapes and placed them on the back side of the background. Now my monstar is ready to snuggle up with a nice good book.

Friday, June 19, 2009

Scented & Colored Epsom Salts w/ Etched Glass Jar

Materials Needed:
• glass jar
• Epsom salts
• soap dyes
• soap scents
• decorative bow
• vinyl contact paper
• etching cream
• craft knife


* detail of etching

This is a simple project that makes a great gift.

To start I cleaned the jar thoroughly and placed the vinyl contact paper on top and drew what I wanted to etch into the glass (ie. the heart in the close up photo). Then I got my craft knife and cut out the parts that I wanted to be etched and brushed on my etching cream. I waited the amount of time indicated on the instructions and then rinsed it thoroughly in warm water and then peeled the vinyl contact off and cleaned it again.

Once it was dried I put the Epsom salts inside (not filling it too much) and put a few drops (about 10 for the size I used) of both the sent (Japanese lotus blossom) and the color (I started with green). Then I stirred it until the color looked pretty mixed in then I added more Epsom salts and more color (this time I added blue to give it a sort of tie-dyed effect). Then I closed the jar and shook it around stirring the colors. Then to finish it off I tied a bow around the neck of the jar and now it is a perfect gift to give. And what is nice is that when the Epsom salts are gone you can put a candle inside the jar and the etching takes on a whole new life.

Thursday, June 18, 2009

Scrap T-Shirt Rings

Materials Needed:
• scrap t-shirt material (or any material that will not unravel)
• beads
• needle & thread
• hot glue
• googly eye


So this idea came from having a bunch of tiny scraps and wanted to use them. All I did was grab a thin long strip of t-shirt and put around my finger and tied a double knot. Then I wrapped the rest of the material around the knot and took a straight pin and pinned it into place. Next I grabbed my needle & thread and started it going up through one of the overlapped areas. Once I was up through the material I placed a bead or 2 on top of the needle and went back down into the material. I did this all the way around the ring until I had a beaded area. Next I heated up my glue gun and got a googly eye then glued it right onto the top. Now I have a googly eye bling ring.

Wednesday, June 17, 2009

Picture Frame

Materials Needed:
• picture frame
• scrap pieces of paper
• Mod Podge
• vinyl contact paper
• etching cream
• silk flowers
• rhinestones
• craft knife
• 2 photos
• cardboard
• hot glue & hot glue gun


This is a frame I made for my little sis who is going to camp for 3 weeks. I wanted it to be fun and funky and several layers. I bought a frame that was simple but had a 3-dimensional quality since I had planned to make it with layers. Then I grabbed my scrap pieces of paper and Mod Podge and decoupaged the frame (I took out the glass and mat board and back piece off). On the back area where the back piece would fit in I tried to keep any paper and Mod Podge off of it (it didn't work out to well but I will get to that).

While I waited for the sides to dry I got the glass and cleaned it thoroughly and then placed the vinyl contact paper on top of the glass where I wanted to etch the glass (it's a bit hard to see all the etching in the photo above but it adds a nice frosted layer to the frame). When they vinyl contact paper was in place and the bubbles smoothed out I drew a leaf vine type design on 2 of the corners and then got my craft knife and cut out the design. Next I got the etching cream and brushed it on according to the instructions and waited the directed amount of time. Then I rinsed it off thoroughly in warm water and took the stencil off then cleaned the glass again.

When the frame was dried I placed the etched glass into the frame. Then I printed out the photos I wanted to use. One for the foreground cut out collage style and black and white and the other to be the main picture. Then I figured out where I wanted the front picture to be placed and hot glued cardboard behind it to make it more 3-dimensional.

Once the pictures were in place I put the back of the frame on, which as you know I had some issues with- I guess some Mod Podge or paper got into the spot or something. So I grabbed my craft knife and trimmed the back board to fit into the frame snugly.

Once that was all done I hot glued little purple bows and some of those silk flowers I have lying around and rhinestones on top. Now she will have a nice handmade picture frame to bring with her to camp.

Tuesday, June 16, 2009

Duct Tape Monstar Coasters

Materials Needed:
• duct tape
• craft knife
• scissors
• self-healing cutting board


Duct tape is always a fun medium. For this project I highly recommend working on a self healing cutting board because you can stick the duct tape down on it to cut it and peel it off easily.

To start I got my self healing cutting board and taped strips of one color of the duct tape to make the background once I had one side down I flipped it over and placed strips of the same color down but in the opposite direction (ie. if you laid your first ones down horizontally the other side was laid down vertically giving it a more secured base). When I had a big enough area covered in duct tape front and back I cut out a square (this would be the size of the final coaster). Once that was done I created my monstars using by laying down a few strips of color for the monstar base and then I cut it out to the shape I wanted. Then I placed it on top of the square and trimmed off any that wasn't on the square. Then I added a duct tape boarder in a different color. To do this I just laid out a piece of duct tape and cut it in half length wise, then taped it on the sides and folded it over to the back. Then I would tape down a piece of the desired color and cut out little details that I wanted to add.

What is nice about working with duct tape- if you place something and want to change it you can easily pick it up and move it.

Monday, June 15, 2009

Super Simple Pocket Notebook

Materials Needed:
• thin cardboard
• decorative paper
• hole punch
• paper of your choice for inside
• glue
• ribbon
• sticker or other decorations (optional)


* front


* back

So this little pocket notebook is a really easy one to make. I just grabbed some thin cardboard laying around and cut it to the size I wanted my notebook to be. Then I cut out an exact replica so I have 2 pieces of thin cardboard for front and back of my book. Next I got my decorative paper and glued it onto each piece of cardboard separately. I trimmed around the edges so that I had enough to fold over but not too much so that it would be bulky. Then I folded it over to the other side and glued it down. Then I grabbed a piece of plain colored paper and folded the edges to be just short of my original measurements and then folded it the other way and gently tore where I folded it (giving me a nice deckle edge). Then I glued that onto the inside cover (do this twice so you have a front and back piece). Next I got my hole punch and punched 2 holes in it where I wanted them.

Then I cut out my writing/drawing paper to be the size of my cardboard and punched holes in it using my covers as a template to match the holes. I grabbed some next and threaded it through the holes and tied a few knots. Finally I added a thick glittery heart sticker on top. You can decorate however you want or even leave it plain and draw on it as you go.